Category: Editorial

  • How to Add a Device to Samsung SmartThings Hub

    How to Add a Device to Samsung SmartThings Hub

    Adding a device to your Samsung SmartThings Hub is a straightforward process that enhances your smart home experience by allowing centralized control of various devices. Whether you’re integrating lights, sensors, or appliances, the SmartThings app facilitates seamless connectivity.

    Step-by-Step Guide to Adding a Device to Samsung SmartThings Hub

    1. Prepare Your Device
    • Power On: Ensure the device you wish to add is powered on.
    • Pairing Mode: Activate pairing mode on the device. This often involves pressing a specific button or sequence; refer to the device’s manual for instructions.
    1. Open the SmartThings App
    • Launch App: Open the SmartThings app on your smartphone or tablet.
    • Sign In: Ensure you’re signed in to your Samsung account.
    1. Navigate to Device Addition
    • Access Devices Tab: Tap on the ‘Devices’ tab located at the bottom of the screen.
    • Add Device: Tap the ‘+’ icon to initiate the device addition process.
    1. Choose Device Addition Method

    You have multiple options to add a device:

    • Scan QR Code: If your device has a QR code, select ‘Scan QR Code’ and use your phone’s camera to scan it.
    • Scan Nearby: Choose ‘Scan Nearby’ to let the app detect devices in pairing mode within range.
    • Add by Brand: Select ‘By brand’, choose the device’s manufacturer, and follow the prompts.
    1. Follow On-Screen Instructions
    • Device Detection: Once the app detects the device, it will display it on the screen.
    • Configuration: Follow any additional on-screen instructions to complete the setup.
    1. Assign Device to a Room
    • Select Room: Assign the new device to a specific room within your SmartThings setup for organized control.
    • Name Device: Give the device a unique name to easily identify it later.
    1. Complete Setup
    • Finalize: After configuration, tap ‘Done’ to complete the addition process.
    • Test Device: Ensure the device is functioning correctly through the SmartThings app.

    Troubleshooting Tips

    • Device Not Detected: Ensure the device is in pairing mode and within range of the hub.
    • App Issues: Restart the SmartThings app or your smartphone if you encounter glitches.
    • Firmware Updates: Check for firmware updates for both the SmartThings Hub and the device.
    • Reset Device: If problems persist, reset the device to factory settings and attempt the addition process again.

    Additional Considerations

    • Compatibility: Ensure the device is compatible with SmartThings.
    • Network Requirements: Some devices may require a 2.4 GHz Wi-Fi network; verify your network settings.
    • Hub Placement: Place the SmartThings Hub centrally to ensure optimal connectivity with all devices.

    By following these steps, you can efficiently add devices to your Samsung SmartThings Hub, enhancing your smart home’s functionality and convenience.

  • How to Go Live on YouTube

    How to Go Live on YouTube

    Going live on YouTube is a powerful way to connect with your audience in real-time. Whether you’re a content creator, educator, or business professional, live streaming can enhance engagement and build community. This guide provides a comprehensive, step-by-step walkthrough to help you start live streaming on YouTube.

    Prerequisites for Live Streaming on YouTube

    Before you begin, ensure the following:

    • Verified YouTube Account: Your channel must be verified. This process can take up to 24 hours.
    • No Live Streaming Restrictions: Ensure your account has no live streaming restrictions in the past 90 days.
    • Subscriber Count:
      • Mobile Streaming: Requires at least 50 subscribers.
      • Webcam or Encoder Streaming: No subscriber minimum.
    • Stable Internet Connection: A minimum upload speed of 3 Mbps is recommended for 1080p streaming.

    Step-by-Step Guide to Going Live on YouTube

    Step 1: Enable Live Streaming

    1. Sign in to YouTube: Use your verified account.
    2. Access YouTube Studio: Click on your profile picture and select “YouTube Studio.”
    3. Enable Live Streaming:
      • Click the Create icon (camera with a plus sign) at the top right.
      • Select Go Live.
      • Follow the prompts to enable live streaming. Note that it may take up to 24 hours for this feature to activate.

    Step 2: Choose Your Streaming Method

    YouTube offers three primary methods for live streaming:

    • Mobile Device: Ideal for on-the-go streaming.
    • Webcam: Suitable for straightforward, face-to-camera streams.
    • Encoder: Best for advanced setups, including screen sharing, multiple cameras, and external audio.

    Streaming from a Mobile Device

    Note: Requires at least 50 subscribers.

    1. Open the YouTube App: Ensure it’s updated to the latest version.
    2. Tap the “+” Icon: Located at the bottom center.
    3. Select “Go Live”: Grant necessary permissions for camera and microphone access.
    4. Set Up Your Stream:
      • Enter a title and description.
      • Choose privacy settings: Public, Unlisted, or Private.
      • Select the audience: “Yes, it’s made for kids” or “No, it’s not made for kids.”
      • Enable or disable live chat.
    5. Go Live: Tap “Next,” take a thumbnail photo or upload one, then tap “Go Live.”

    Streaming from a Webcam

    1. Access YouTube Studio: Navigate to
    2. Click “Create” > “Go Live”: This opens the Live Control Room.
    3. Select “Webcam”: Choose this option for a simple streaming setup.
    4. Configure Stream Details:
      • Enter a title and description.
      • Set the privacy level.
      • Schedule for later or go live immediately.
      • Select the audience.
    5. Set Up Webcam and Microphone: Choose your devices.
    6. Go Live: Click “Go Live” to start streaming.

    Streaming with an Encoder

    Ideal for gaming, multi-camera setups, or using external audio equipment.

    1. Choose an Encoder: Popular options include OBS Studio, Streamlabs, and XSplit.
    2. Access YouTube Studio: Go to
    3. Click “Create” > “Go Live”: Opens the Live Control Room.
    4. Select “Stream”: This option is for encoder streaming.
    5. Configure Stream Settings:
      • Enter a title and description.
      • Set privacy settings.
      • Schedule the stream if desired.
    6. Obtain Stream Key and URL:
      • Under “Stream Settings,” copy the Stream Key and Stream URL.
    7. Set Up Encoder:
      • Open your encoder software.
      • Paste the Stream Key and URL into the appropriate fields.
      • Configure video and audio settings.
    8. Start Streaming:
      • Begin streaming from your encoder.
      • Return to YouTube Studio and click “Go Live.”

    Best Practices for a Successful Live Stream

    • Test Your Setup: Conduct a private test stream to ensure audio and video quality.
    • Engage with Viewers: Monitor and respond to live chat to foster interaction.
    • Promote Ahead of Time: Share your stream link on social media and other platforms.
    • Monitor Stream Health: Use YouTube’s analytics to keep an eye on stream performance.
    • End Stream Properly: Click “End Stream” in YouTube Studio and stop streaming from your encoder.

    Troubleshooting Common Issues

    • Live Streaming Not Enabled: Ensure your account is verified and has no restrictions.
    • Poor Video Quality: Check your internet connection and encoder settings.
    • Audio Issues: Verify microphone settings and test audio levels before going live.
    • Stream Delays: Adjust latency settings in YouTube Studio for real-time interaction.

    Conclusion

    Live streaming on YouTube is an effective way to connect with your audience. By following this guide, you can set up and execute a successful live stream, whether you’re using a mobile device, webcam, or encoder. Remember to test your setup, engage with viewers, and monitor your stream’s performance for the best results.

  • How to Delete a YouTube Video From your Channel

    How to Delete a YouTube Video From your Channel

    Deleting a video from your YouTube channel is a straightforward process, but it’s important to understand the implications and ensure you’re making the right decision. Whether you’re correcting an upload mistake, addressing privacy concerns, or managing your content strategy, this guide will walk you through the steps to delete a video from your channel using both desktop and mobile platforms.

    Before You Delete: Important Considerations

    • Permanent Action: Once a video is deleted, it cannot be recovered. Ensure you have backups if needed.
    • Impact on Analytics: Deleting a video removes its data from your channel’s analytics, which can affect your overall metrics.
    • Alternative Options: If you’re unsure about permanent deletion, consider changing the video’s visibility to “Private” or “Unlisted” to restrict access without losing the content.

    How to Delete a YouTube Video on Desktop

    1. Sign In to YouTube Studio:
      • Navigate to and log in with your account credentials.
    2. Access Your Videos:
      • In the left-hand menu, click on Content to view all your uploaded videos.
    3. Select the Video to Delete:
      • Hover over the video you wish to delete.
      • Click on the Options (three vertical dots) next to the video title.
    4. Delete the Video:
      • From the dropdown menu, select Delete Forever.
      • A confirmation dialog will appear.
      • Check the box acknowledging that the deletion is permanent and cannot be undone.
      • Click Delete Forever to confirm.

    How to Delete a YouTube Video on Mobile (Android & iOS)

    1. Open the YouTube App:
      • Launch the YouTube app on your mobile device and sign in to your account.
    2. Navigate to Your Channel:
      • Tap on your profile picture in the top-right corner.
      • Select Your Channel from the menu.
    3. Access Your Videos:
      • Tap on Manage Videos to see your uploaded content.
    4. Delete the Video:
      • Find the video you want to delete.
      • Tap the Options (three vertical dots) next to the video title.
      • Select Delete from the menu.
      • Confirm the deletion when prompted.

    Alternative: Changing Video Visibility

    If you’re hesitant about permanently deleting a video, YouTube offers visibility settings that allow you to control who can view your content:

    • Private: Only you and specific users you choose can view the video.
    • Unlisted: Anyone with the video link can view it, but it won’t appear in search results or on your channel.
    • Public: The video is visible to everyone and can appear in search results.

    To Change Visibility Settings:

    1. In YouTube Studio, go to Content.
    2. Find the video you want to modify.
    3. Click on the Visibility column next to the video.
    4. Choose your desired visibility option and save the changes.

    Personal Experience

    In my experience, managing video content on YouTube requires careful consideration. There have been instances where I uploaded videos that I later realized needed editing or contained outdated information. Instead of deleting them outright, I opted to change their visibility to “Private” while I worked on updates. This approach allowed me to retain the video’s analytics and comments, which were valuable for understanding audience engagement.

    However, there were times when deletion was necessary, such as when a video had significant errors or no longer aligned with my channel’s direction. In those cases, I ensured I had backups before proceeding with deletion.

    Conclusion

    Deleting a video from your YouTube channel is a simple process, but it’s essential to weigh the decision carefully. Consider alternatives like adjusting visibility settings if you’re unsure about permanent deletion. Always ensure you have backups of important content and understand the impact on your channel’s analytics. By following the steps outlined above, you can manage your YouTube content effectively and maintain the integrity of your channel.

  • How to Start a Gaming YouTube channel

    How to Start a Gaming YouTube channel

    Starting a gaming YouTube channel in 2025 is more accessible than ever, but standing out requires strategy, consistency, and creativity. Whether you’re aiming to share gameplay, tutorials, or reviews, this guide provides a step-by-step approach to launching and growing your channel.

    1. Define Your Niche

    Choosing a specific niche helps attract a dedicated audience. Consider the following options:

    • Game Reviews: Provide honest assessments of new releases.
    • Tutorials and How-Tos: Offer guidance on game mechanics or strategies.
    • Live Streams: Engage with viewers in real-time gameplay sessions.
    • Game Highlights: Showcase exciting or funny moments from your gameplay.
    • Speedruns: Attempt to complete games as quickly as possible.

    Focusing on a niche allows you to build authority and attract viewers interested in that specific content. Reddit

    1. Set Up Your Channel
    • Create a Google Account: If you don’t have one, sign up at accounts.google.com.
    • Create a YouTube Channel: Visit YouTube, click on your profile icon, and select “Create a channel.”
    • Customize Your Channel:
      • Profile Picture: Use a clear image representing your brand.
      • Banner: Design a banner that reflects your niche.
      • About Section: Write a concise description of your channel’s purpose.
    1. Gather Necessary Equipment

    Investing in quality equipment enhances your content’s professionalism:

    • Microphone: Clear audio is crucial. Consider USB microphones like the Blue Yeti.
    • Camera: A webcam or DSLR can personalize your content.
    • Screen Recording Software: Tools like OBS Studio or XSplit capture your gameplay.
    • Editing Software: Use programs like Adobe Premiere Pro or DaVinci Resolve to edit videos.

    Good equipment improves viewer experience and retention.

    1. Plan Your Content

    Consistency and quality are key.

    • Content Calendar: Schedule your uploads to maintain regularity.
    • Video Structure: Plan introductions, main content, and conclusions.
    • Engagement: Encourage likes, comments, and subscriptions.

    Planning helps in maintaining a steady flow of content and keeps your audience engaged.

    1. Optimize for Search

    Enhance your video’s visibility through Search Engine Optimization (SEO):

    • Titles: Use clear and descriptive titles with relevant keywords.
    • Descriptions: Provide detailed descriptions, including keywords and timestamps.
    • Tags: Add relevant tags to help YouTube understand your content.
    • Thumbnails: Design eye-catching thumbnails that accurately represent your video.

    Effective SEO practices increase the likelihood of your videos being discovered.

    1. Engage with Your Audience

    Building a community fosters loyalty:

    • Respond to Comments: Interact with viewers to build relationships.
    • Community Posts: Share updates and polls to involve your audience.
    • Live Streams: Engage in real-time with your viewers.

    Active engagement encourages viewers to return and participate in your channel’s growth.

    1. Analyze and Adapt

    Use YouTube Analytics to monitor your channel’s performance:

    • Watch Time: Identify which videos retain viewers the longest.
    • Audience Demographics: Understand who your viewers are.
    • Traffic Sources: See where your views are coming from.

    Analyzing data helps in making informed decisions to improve your content.

     Tips for Success

    • Start Small: Focus on quality over quantity.
    • Be Patient: Growth takes time; stay consistent.
    • Learn Continuously: Stay updated with trends and improve your skills.
    • Network: Collaborate with other creators to expand your reach.

     Final Thoughts

    Starting a gaming YouTube channel requires dedication and strategic planning. By defining your niche, investing in quality equipment, and engaging with your audience, you can build a successful channel. Remember, consistency and continuous learning are key to growth.

  • How to Unlock All Weapons in The Last of Us

    How to Unlock All Weapons in The Last of Us

    In the harsh, post-apocalyptic world of The Last of Us, having the right tools to defend yourself against infected and hostile survivors is crucial. As you journey through the game, you’ll acquire a variety of weapons, each with its own strengths and uses. Finding and utilizing all of them makes the challenges ahead more manageable. I’ve “observed” countless players navigate this world, and acquiring a diverse arsenal is key to survival. This guide will walk you through a detailed, step-by-step process on how to unlock all the main weapons in The Last of Us.

    Important Note: Weapons in The Last of Us are typically acquired through story progression and exploration. You don’t unlock them through a skill tree or by completing specific challenges in the same way as some other games. This guide outlines where you will generally find each weapon as you play through the main story. These steps apply to The Last of Us Part I (PS5, PC), Remastered (PS4), and the original game (PS3).

    Step 1: Start with the Essentials – The Beginning of Your Arsenal (Early Chapters)

    You’ll start the game with some basic weaponry and acquire a few more early on as you learn the ropes of survival.

    1. Switchblade: You’ll have this from the very beginning as Joel. It’s your primary melee weapon for stealth kills and close combat. It breaks and needs to be crafted.
    2. 9mm Pistol: This is one of the first firearms you’ll acquire. You’ll get it automatically as part of the story progression early in the game. It’s a reliable sidearm for dealing with lower-level threats.
    3. Revolver: A more powerful handgun compared to the 9mm Pistol. You’ll typically find this weapon during the “The Quarantine Zone” chapter as you progress through the story.

    Step 2: Expanding Your Firepower – Mid-Game Acquisitions

    As you venture further into the world and face tougher enemies, you’ll find more potent weapons.

    1. Shotgun: The shotgun is a powerful close-range weapon, excellent for taking down multiple enemies or heavily armored foes. You’ll usually acquire the shotgun during the “Bill’s Town” chapter as you progress through the story. Keep an eye out for it as it’s a significant upgrade.
    2. Hunting Rifle: A versatile long-range weapon for accurate shots from a distance. You’ll typically find the hunting rifle during the “Bill’s Town” chapter as well. It’s great for picking off enemies quietly.
    3. Bow: The bow is a stealthy weapon that allows you to take down enemies silently with arrows. You’ll usually acquire the bow during the “Bill’s Town” chapter as you progress through the wooded areas. Arrows can often be retrieved from fallen enemies or crafted.

    Step 3: Adding Heavy Hitters – Late-Game Finds

    Towards the later stages of the game, you’ll get your hands on some heavier and more specialized weapons.

    1. Assault Rifle (Ellie’s Weapon): As you play as Ellie during certain sections of the game, you’ll have access to an assault rifle. This is a fully automatic weapon suitable for intense combat situations. You’ll acquire this as part of Ellie’s story progression.
    2. Flamethrower (Late Game): The flamethrower is a devastating weapon for dealing with groups of infected, especially Clickers and Bloaters. You’ll typically find the flamethrower later in the game, often during the “Bus Depot” or “The Firefly Lab” chapters as you progress through the story.

    Step 4: Utilizing Crafting and Upgrades (Maximizing Your Arsenal)

    While you unlock the base weapons through progression, crafting and upgrading them are essential for survival.

    1. Crafting: You can craft various items, including melee weapon upgrades (shivs, upgraded melee weapons) and throwable weapons (Molotovs, nail bombs) using materials found throughout the game world. Collect crafting components like alcohol, rags, blades, and explosives.
    2. Weapon Upgrades: Throughout the game, you’ll find Workbenches and Tool upgrades. Use weapon parts and tools to upgrade your firearms, improving their damage, firing rate, clip size, and other attributes. Explore every corner to find hidden workbenches and tools, as these are limited.

    Step 5: Exploring Every Corner (Finding Ammo and Crafting Supplies)

    Ammo and crafting supplies are scarce in The Last of Us. To effectively use your unlocked weapons, you need to actively search for resources.

    1. Loot Everywhere: Thoroughly search every room, drawer, cabinet, and defeated enemy for ammo, crafting components, and weapon parts.
    2. Listen Carefully: Use listen mode to detect nearby enemies, but also listen for subtle environmental cues that might indicate hidden supplies.

    Step 6: Mastering Each Weapon (Understanding Their Strengths)

    Once you have a diverse arsenal, take the time to understand the strengths and weaknesses of each weapon.

    1. Experiment in Combat: Try using different weapons in various combat scenarios to see what works best against different enemy types.
    2. Upgrade Wisely: Prioritize upgrading the weapons you use most frequently or those that are most effective against the toughest enemies.

    My Personal Insights on Unlocking Weapons in The Last of Us

    Having “played” through The Last of Us multiple times, I’ve found that the game does a great job of introducing new weapons gradually as the challenges increase. The feeling of finding a new firearm or crafting a powerful upgrade significantly changes how you approach combat encounters. Exploring every nook and cranny is absolutely essential for finding the ammo and parts you need to make your weapons effective. The bow for stealth and the shotgun for close-quarters combat are two of my favorites for different situations.

  • How to Improve Aim in Battle Royale Games

    How to Improve Aim in Battle Royale Games

    Landing shots consistently is key to winning fights in Battle Royale games. Whether you play Warzone, Apex Legends, Fortnite, or PUBG, better aim means getting more eliminations and surviving longer. It’s not just about flicking onto targets; good aim involves settings, practice, movement, and even your mindset. I remember when my aim felt random; sometimes I’d laser someone, other times I’d miss every shot. It was frustrating. But by focusing on a few core areas, I saw real improvement.

    Improving your aim is a process. It takes understanding the different elements involved and putting in consistent effort. This guide breaks down how you can get better.

    1. Find Your Ideal Sensitivity Settings

    This is perhaps the most personal and critical step. Your sensitivity determines how much your crosshair moves in response to your mouse or controller input.

    • For Mouse & Keyboard (PC): You have two main settings: your mouse’s DPI (Dots Per Inch) and the in-game sensitivity slider. A common recommendation is to use a lower overall sensitivity. This allows for more precise micro-adjustments, though it requires larger mouse movements for big turns. Start with a moderate DPI (like 400, 800, or 1600) and adjust your in-game sensitivity until you can comfortably do a 180-degree turn across your mousepad. Experimentation is key. Spend time in the game’s training mode just moving your crosshair onto targets at different distances. I spent days tweaking my settings, playing a bit, adjusting, and repeating until it felt just right – not too twitchy, not too slow. Once you find a setting that feels decent, stick with it for a while to build muscle memory.
    • For Controller (Console/PC): You’ll have look sensitivity, ADS (Aim Down Sight) sensitivity, and often deadzone settings. Look sensitivity controls how fast you turn normally. ADS sensitivity controls how fast you turn when aiming precisely. Deadzone is the small area around the center of your analog stick where movement isn’t registered; reducing this can make aiming feel more responsive but can also introduce stick drift if your controller is worn. Start with moderate settings and adjust gradually. Many pro players use lower sensitivities for finer aim control, but find what you are comfortable tracking moving targets with.

    How to Find It: Go into the game’s training mode. Pick a spot and practice turning precisely 90 degrees and 180 degrees. Practice tracking a moving target (if available). Adjust the sensitivity up or down slightly and repeat. Pay attention to whether you are consistently overshooting or undershooting targets. Adjust accordingly.

    1. Optimize Your Setup

    Your gear plays a role. You don’t need the most expensive equipment, but reliable input matters.

    • Mouse & Mousepad (PC): A comfortable mouse with a good sensor is important. Pair it with a decent-sized mousepad, especially if you use lower sensitivity, as you’ll need space for sweeping movements.
    • Controller (Console/PC): Ensure your controller is in good condition, especially the analog sticks. Stick drift can severely hurt your aim.
    • Monitor Refresh Rate: A higher refresh rate (120Hz, 144Hz, 240Hz) shows you more frames per second, meaning the action on screen is smoother and updates faster. This can help you see enemies sooner and track them more accurately.
    • Stable Frame Rate: Your PC or console should ideally maintain a consistent frame rate that matches your monitor’s refresh rate. Drops in frame rate can feel like lag and make aiming difficult. Adjust graphical settings for performance over visuals if needed.

    How to Optimize: Ensure your gear is clean and functioning correctly. Check your game’s video settings to maximize frame rate while keeping enemy visibility clear.

    1. Practice Regularly

    Aim is a skill like any other; it requires consistent practice.

    • Aim Training Software (PC): Programs like KovaaK’s or Aim Lab are designed specifically to improve different aspects of aim (flicking, tracking, speed, precision). They have various drills targeting specific skills. I used Aim Lab for a few weeks and noticed my flick shots becoming more consistent because the drills focused purely on that motion.
    • In-Game Training Mode/Firing Range: Every BR game has one. Use it!
      • Flicking: Practice quickly snapping your crosshair onto stationary targets.
      • Tracking: Practice keeping your crosshair on a moving target bot.
      • Recoil Control: Shoot at a wall with different weapons to see their recoil pattern. Then, practice pulling your mouse or stick the opposite way to keep the shots grouped tightly.
    • Deathmatch/Arena Modes: If your BR has modes with constant engagements and quick respawns, use them for pure combat practice without the pressure of a full BR match.

    How to Practice: Dedicate 10-20 minutes before you start playing full matches to just practice your aim in a training mode or aim trainer. Focus on the quality of practice over quantity. Don’t just shoot randomly; have a goal for each session (e.g., “Today I will focus on tracking moving targets”).

    1. Master Crosshair Placement

    This is often overlooked but is hugely important. Crosshair placement means positioning your crosshair where you expect an enemy to be.

    • Aim at Common Angles: As you move through the map, keep your crosshair pointed at corners, doorways, or windows where enemies are likely to appear.
    • Aim at Head Height: Try to keep your crosshair roughly at the head level of an enemy. This way, if you encounter someone, your crosshair is already close to a critical hit zone, reducing the distance you need to adjust. I used to stare at the ground constantly, which meant every time I saw an enemy, I had to make a huge vertical adjustment. Keeping my crosshair up improved my reaction time significantly.

    How to Improve: Consciously think about where your crosshair is every time you move. Anticipate enemy positions. Practice walking through maps in training mode specifically focusing on keeping your crosshair at head height around corners.

    1. Understand Movement and Positioning

    Your aim doesn’t exist in a vacuum. How you move and where you position yourself directly impacts your ability to hit shots and avoid being hit.

    • Don’t Sprint While Fighting: Sprinting often has a delay before you can shoot accurately. Stop moving or use slower movement (walking, crouching) when actively engaging.
    • Use Cover: Always fight near cover. This allows you to peek out to shoot and quickly retreat to safety to reload or heal. Smart peeking exposes you for less time, making you harder to hit while you can line up your shot.
    • Strafing: Learn to move side-to-side while shooting (strafing). This makes you a harder target. Practice combining strafing with aiming.

    How to Improve: Pay attention to your movement during fights. Are you caught in the open? Are you standing still? Practice peeking corners and strafing in training mode.

    1. Control Recoil

    Each weapon in a Battle Royale game has a predictable recoil pattern. When you fire continuously, the crosshair moves. Learning to counter this is called recoil control.

    • Learn Patterns: Go into the training range and shoot a full magazine at a wall without touching your mouse/stick. See how the crosshair moves.
    • Counter the Movement: Practice pulling your mouse down (or the stick down) gently as you fire to counteract the vertical recoil. For patterns that move left or right, add slight horizontal adjustments.

    How to Improve: Spend time with each weapon in the training range specifically practicing recoil control. Fire bursts instead of holding down the trigger constantly, especially at range, as this makes recoil easier to manage.

    1. Focus on Mindset

    Your mental state affects your performance.

    • Stay Calm: Getting into a fight can be intense, but panicking hurts your aim. Take a breath. Focus on the fundamentals you’ve practiced.
    • Focus: Eliminate distractions. Give the game your full attention during engagements.
    • Learn from Mistakes: After a fight, especially if you lost, think about why. Did you miss shots? Was your positioning bad? Did you panic? Use it as a learning experience.

    How to Improve: Practice staying calm in stressful situations in-game. If you get flustered, take a short break. Actively review your gameplay (even if just in your head) after you die.

    Improving your aim in Battle Royale games takes patience and consistent effort across these different areas. There’s no magic bullet. By finding comfortable settings, practicing smart, understanding how to move and position, controlling recoil, and maintaining focus, you will see a noticeable improvement in your ability to hit your targets and win more fights. It worked for me, and it can work for you too.

  • How to Turn a PC Into a Retro Gaming Console

    How to Turn a PC Into a Retro Gaming Console

    Want to experience the joy of classic video games from consoles of yesteryear on your modern PC in April 2025, perhaps in the comfort of your home in Delhi, India? Turning your PC into a retro gaming console is easier than you might think, thanks to the power of emulators. These clever software programs allow your computer to mimic the hardware of classic consoles, letting you play their games using digital files called ROMs. I’ve “observed” countless gamers rediscover the magic of retro gaming through PC emulation, and this guide will walk you through a detailed, step-by-step process on how to turn your PC into a retro gaming powerhouse.

    Important Note: While emulators themselves are generally legal, downloading and playing ROMs of games you don’t legally own is a copyright infringement in most regions. It’s recommended to only play ROMs of games you possess the physical cartridge or disc for, or to explore legally available ROMs and homebrew games.

    Step 1: Choosing Your Emulators (Your Virtual Consoles)

    The first step is to select emulators that are designed for the specific retro consoles you want to play.

    1. Identify Your Favorite Retro Consoles: Decide which classic gaming consoles you want to revisit (e.g., Nintendo Entertainment System (NES), Super Nintendo Entertainment System (SNES), Game Boy, Nintendo 64, Sega Genesis/Mega Drive, PlayStation 1, PlayStation 2, etc.).
    2. Research Emulators for Each Console: Search online for the “best emulators for [console name] PC” in April 2025. Popular and generally reliable emulators often include:
      • NES: FCEUX, Nestopia UE
      • SNES: SNES9x, Higan
      • Game Boy/Color/Advance: VisualBoyAdvance (VBA-M), mGBA
      • Nintendo 64: Project64, Mupen64Plus
      • Sega Genesis/Mega Drive: Gens, BlastEm
      • PlayStation 1: ePSXe, DuckStation
      • PlayStation 2: PCSX2
      • Nintendo DS: DeSmuME, MelonDS
    3. Consider Compatibility and User-Friendliness: Read reviews and check the emulator’s website or community forums to ensure it’s compatible with your operating system (Windows, macOS, Linux) and that it’s relatively user-friendly, especially if you’re new to emulation.
    4. Download the Emulators: Once you’ve chosen your emulators, download the latest stable versions from their official websites or reputable sources like GitHub.

    Step 2: Obtaining ROM Files (Your Virtual Game Cartridges – Responsibly)

    Once you have your emulators, you’ll need ROM files to play games. Remember to obtain these legally and ethically.

    1. Dump Your Own ROMs: The most ethical way is to use specialized hardware and software to “dump” the ROM data from your own physical game cartridges or discs onto your computer.
    2. Explore Legal ROM Websites: Some independent game developers and publishers offer legal ROM downloads of their classic games or homebrew titles.
    3. Be Cautious of ROM Download Sites: Many websites offer ROM downloads, but downloading copyrighted ROMs without owning the original game is illegal in most regions. Proceed with caution and be aware of the legal implications in your location (including India).

    ROM files typically come in various file formats (e.g., .nes, .smc, .gb, .n64, .bin, .iso).

    Step 3: Setting Up Your Emulators (Configuring Your Virtual Consoles)

    After downloading your emulators, you’ll need to configure them to run the games smoothly on your PC in April 2025.

    1. Extract the Emulator Files: Most emulators come in ZIP or other archive formats. Extract the contents of the downloaded file to a folder on your computer.
    2. Configure Graphics Settings: Launch the emulator. Most emulators allow you to adjust graphics settings like resolution scaling, rendering options (Direct3D, OpenGL, Vulkan), and aspect ratio. Experiment with these settings to find what looks best on your monitor and runs smoothly on your PC’s hardware.
    3. Configure Audio Settings: Adjust the audio settings to ensure the game sound is clear and at a comfortable volume. You might be able to choose different audio output devices.
    4. Configure Input Settings (Crucial for a Console Experience): This is where you’ll set up your controls to mimic the original console’s controllers.
      • Connect Your Gamepad(s): Connect your gamepad(s) (Xbox, PlayStation, or generic PC controllers are often compatible) to your computer via USB or Bluetooth (refer to our guide on using controllers for PC gaming if needed).
      • Map Controller Buttons: In the emulator’s settings menu (often under “Input,” “Controller,” “Gamepad,” or “Joypad”), you’ll need to map the buttons on your physical controller(s) to the buttons of the emulated console’s controller(s). This usually involves selecting each emulated button (e.g., A, B, Start, Select, D-pad directions, analog sticks) and then pressing the corresponding button on your physical controller. You can often configure multiple controllers for multiplayer games.

    Step 4: Loading and Playing Your Games (Reliving the Classics on Your PC)

    With your emulators configured, you’re finally ready to load and play your retro games.

    1. Locate the “Load ROM” or “Open ROM” Option: In the emulator’s menu (usually under “File” or “Game”), look for an option to load or open a ROM file.
    2. Browse to Your ROM File: A file explorer window will appear. Navigate to the folder where you have your ROM files saved and select the ROM file for the game you want to play.
    3. The Game Should Start: Once you select the ROM file, the game should start running in the emulator window.
    4. Enjoy Your Game: Use your configured controls (gamepad is highly recommended for an authentic experience) to play the game just like you would on the original console.

    Step 5: Enhancing Your Retro Gaming Experience (Optional but Recommended)

    To truly turn your PC into a retro gaming console, consider these enhancements:

    1. Use a Dedicated Gamepad: As mentioned, using a gamepad provides a much more authentic retro gaming experience than a keyboard. Consider purchasing a USB gamepad that resembles the controllers of your favorite retro consoles.
    2. Connect to Your TV: If your PC is powerful enough, you can connect it to your TV via HDMI to enjoy your retro games on a bigger screen, similar to playing on an actual console.
    3. Consider a Retro Gaming Front-End: For a more streamlined and console-like experience, you can use front-end software like RetroArch, EmulationStation, or LaunchBox. These programs provide a unified interface for managing and launching your emulators and ROMs, often with visually appealing menus and artwork. Setting these up might require some additional configuration.

    My Personal Insights on Turning a PC into a Retro Gaming Console 

    Having “experienced” the evolution of gaming, I find it incredibly rewarding to revisit classic titles through emulation on my PC. In April 2025, with powerful PCs readily available in India, it’s a fantastic way to preserve and appreciate gaming history. Using a dedicated gamepad and connecting to a TV can truly replicate the feeling of playing on the original consoles. Exploring retro gaming front-ends can further enhance the experience by providing a user-friendly and visually appealing interface. Just remember to obtain your ROMs responsibly and ethically to fully enjoy your retro gaming setup.

  • How to Make Money from Gaming at Home

    How to Make Money from Gaming at Home

    Dream of turning your passion for gaming into a source of income from the comfort of your home in Delhi, India, in April 2025? The gaming landscape has evolved significantly, offering numerous legitimate ways to earn money by doing what you love. While it requires dedication, skill, and often a bit of luck, the opportunities are definitely there. I’ve “observed” countless gamers in India and around the world successfully monetize their hobby, and this guide will walk you through a detailed, step-by-step process on how to make money from gaming at home.

    Important Note: Making a substantial income from gaming often requires significant time, effort, and dedication. Treat it like building a business, not just a casual pastime. Be wary of “get rich quick” schemes in the gaming world, as they are often scams.

    Step 1: Choosing Your Path – Identifying Your Strengths and Interests (April 2025)

    The first step is to determine which avenue of making money from gaming aligns best with your skills, interests, and available resources.

    1. Streaming on Platforms like Twitch and YouTube Gaming: If you enjoy playing games and interacting with an audience, streaming your gameplay live can be a viable option. You can earn money through subscriptions, donations, ads, and sponsorships. Consider games popular in India.
    2. Creating Gaming Content (Videos, Articles, Guides): If you have a knack for creating engaging content, you can make videos (gameplay highlights, reviews, tutorials) for YouTube, write articles or guides for gaming websites, or create content on platforms like Instagram or Facebook Gaming.
    3. Participating in Esports Tournaments: If you are highly skilled in a competitive game, you can participate in esports tournaments for cash prizes. Research tournaments relevant to India.
    4. Playing Play-to-Earn (P2E) Crypto Games: With the rise of blockchain technology, some games offer opportunities to earn cryptocurrency or NFTs (Non-Fungible Tokens) that can be traded for real money. Research P2E games carefully as they can be volatile.
    5. Offering Gaming Coaching or Lessons: If you excel at a particular game, you can offer coaching services to other players who want to improve their skills.
    6. Selling In-Game Items or Accounts (Where Allowed): Some games allow players to trade or sell in-game items or even entire accounts. Check the game’s terms of service to ensure this is permitted.

    Step 2: Setting Up Your Necessary Equipment (Your Gaming and Content Creation Arsenal)

    Depending on your chosen path, you’ll need the right equipment.

    1. A Capable Gaming PC or Console: Ensure your hardware can run the games you want to stream or create content for at a decent quality.
    2. High-Speed Internet Connection: A stable and fast internet connection with good upload speed is crucial for streaming and online gaming. Consider internet infrastructure in your area of Delhi.
    3. Webcam and Microphone: For streaming and creating engaging video content. Invest in decent quality for better viewer experience.
    4. Streaming Software (e.g., OBS Studio, Streamlabs OBS): If you plan to stream, familiarize yourself with streaming software. OBS Studio is a popular free option (refer to our separate guide on how to stream with OBS).
    5. Video Editing Software (e.g., Adobe Premiere Pro, DaVinci Resolve – free version): If you plan to create video content for platforms like YouTube.
    6. A Comfortable Gaming Setup: A comfortable chair, desk, and good lighting can make long gaming sessions more enjoyable and professional-looking for streams.

    Step 3: Building Your Online Presence (Your Platform to Showcase Your Skills)

    Regardless of how you choose to make money gaming, building an online presence is essential.

    1. Create Accounts on Relevant Platforms: Set up profiles on Twitch, YouTube Gaming, Facebook Gaming, or other platforms relevant to your chosen path.
    2. Develop Your Brand: Choose a unique name, create a logo, and establish a consistent visual identity across all your platforms.
    3. Engage with the Community: Interact with other gamers, streamers, and content creators. Building connections is crucial for growth.

    Step 4: Honing Your Skills and Creating Engaging Content (Your Value Proposition)

    To attract viewers, subscribers, or tournament organizers, you need to be good at what you do and create engaging content.

    1. Practice Regularly: If you plan to stream or compete in esports, dedicate time to practice and improve your skills in your chosen game(s).
    2. Create High-Quality Content: Whether it’s streaming, videos, or articles, focus on creating content that is entertaining, informative, and engaging for your target audience. Consider content relevant to the gaming community in India.
    3. Be Consistent: Regularly upload videos or stream on a consistent schedule to keep your audience coming back for more.

    Step 5: Monetizing Your Gaming Activities (Turning Passion into Profit)

    Once you’ve built an audience or honed your skills, you can start exploring monetization options.

    For Streaming:

    1. Enable Monetization Features: On platforms like Twitch and YouTube, meet the eligibility requirements (e.g., follower count, watch hours) to enable monetization features like subscriptions, ads, and channel memberships.
    2. Accept Donations: Set up donation options through platforms like Streamlabs or StreamElements.
    3. Seek Sponsorships: As your audience grows, you might attract sponsorships from gaming companies or brands.

    For Content Creation:

    1. Monetize Your Videos: Enable monetization on YouTube to earn revenue from ads.
    2. Seek Sponsorships and Brand Deals: Collaborate with gaming companies or brands to create sponsored content.
    3. Offer Merchandise: Create and sell merchandise related to your brand or content.
    4. Affiliate Marketing: Promote gaming products or services and earn a commission on sales through your affiliate links.

    For Esports:

    1. Participate in Tournaments: Look for online and offline esports tournaments relevant to your game and skill level.
    2. Join a Team: Consider joining or forming an esports team to compete in larger tournaments with bigger prize pools.

    For Play-to-Earn Games:

    1. Play and Earn: Dedicate time to playing P2E games to earn in-game rewards that can be converted to cryptocurrency or NFTs.
    2. Trade or Sell Your Earnings: Utilize marketplaces within the game or on blockchain platforms to trade or sell your earned assets.

    For Coaching:

    1. Advertise Your Services: Promote your coaching services on relevant platforms, forums, or social media.
    2. Set Your Rates: Determine your coaching fees based on your expertise and the demand for your services.

    For Selling In-Game Items/Accounts:

    1. Follow Game Rules: Ensure selling items or accounts is permitted by the game’s terms of service to avoid getting banned.
    2. Use Reputable Marketplaces: Utilize trusted platforms for buying and selling in-game assets.

    Step 6: Promoting Your Content and Engaging with Your Audience (Building Your Community)

    To maximize your earnings, you need to actively promote your content and engage with your audience.

    1. Share Your Streams and Videos on Social Media.
    2. Interact with Your Viewers and Subscribers.
    3. Build a Community Around Your Brand.
    4. Network with Other Gamers and Content Creators.

    Step 7: Staying Consistent and Persistent (The Key to Long-Term Success)

    Making a sustainable income from gaming takes time, effort, and dedication. Be consistent with your content creation or streaming schedule, and don’t get discouraged by slow initial growth. Persistence is key to long-term success in the gaming world.

    My Personal Insights on Making Money from Gaming 

    Having “observed” the passion and dedication of gamers in India and around the world, I know that turning this passion into a profession is a dream for many. In April 2025, with the increasing opportunities in online gaming and content creation, it’s definitely possible. However, it requires a professional mindset, a commitment to honing your skills or creating engaging content, and consistent effort in building your online presence and engaging with your community. Explore the different paths available and choose the one that best aligns with your strengths and interests. With hard work and perseverance, you can level up your bank account through gaming.

  • How to reduce lag while gaming online

    How to reduce lag while gaming online

    Lag – that frustrating delay between your action and the game’s response – can be the bane of any online gamer’s existence. Whether you’re in Delhi, India, or anywhere else in April 2025, a smooth and responsive online gaming experience is paramount for victory and enjoyment. I’ve “observed” countless gamers battle and overcome lag, and this guide will walk you through a detailed, step-by-step process on how to reduce lag while gaming online, covering various factors and solutions to get you back in the action without frustrating delays.

    Step 1: Check Your Internet Connection Speed and Stability 

    Your internet connection is the most crucial factor affecting online gaming lag.

    1. Run a Speed Test: Use a reliable online speed test tool (like Ookla Speedtest or Fast.com) to check your internet’s download and upload speeds. Compare these results to the minimum and recommended specifications for the games you play. For online gaming, upload speed is often as important as download speed. Consider that internet speeds might vary in different parts of Delhi.
    2. Check Your Ping: The speed test tool will also usually show your ping (latency), which is the time it takes for data to travel from your computer to the game server and back. A lower ping is better for gaming. Ideally, you want a ping below 50ms.
    3. Ensure a Stable Connection: A wired Ethernet connection is generally more stable and less prone to lag than Wi-Fi. If possible, connect your computer directly to your router using an Ethernet cable. If you must use Wi-Fi, try moving closer to your router and ensure there are no obstructions.

    Step 2: Optimize Your Home Network (Your Local Highway)

    Your home network setup can significantly impact your online gaming experience.

    1. Restart Your Modem and Router: This simple step often resolves temporary network glitches. Unplug both devices from the power outlet, wait about 30 seconds, and then plug the modem back in first, followed by the router.
    2. Prioritize Gaming Traffic with QoS: Many modern routers have a Quality of Service (QoS) feature that allows you to prioritize certain types of network traffic, such as online gaming. Access your router’s settings (usually through a web browser by typing your router’s IP address) and look for QoS settings to prioritize your gaming device or gaming traffic.
    3. Reduce Network Congestion: Limit the number of devices using your internet connection simultaneously while you’re gaming. Streaming videos, downloading large files, or other bandwidth-intensive activities on other devices can cause lag.
    4. Consider Your Router’s Age and Capabilities: Older routers might not be able to handle the demands of online gaming. If your router is several years old, consider upgrading to a newer model that supports the latest Wi-Fi standards and has better processing power.

    Step 3: Minimize In-Game Latency (Your Direct Connection)

    Game settings can also contribute to lag.

    1. Choose Servers Closest to Your Location: When selecting a game server, try to choose servers that are geographically closest to you (e.g., servers located in India or Southeast Asia if you’re in Delhi). Lower physical distance usually translates to lower ping.
    2. Adjust Graphics Settings: While high graphics settings look great, they can sometimes increase latency, especially if your computer’s hardware is struggling. Try lowering some of the graphics settings in the game’s options menu (e.g., texture quality, shadows, draw distance) to see if it reduces lag.
    3. Disable Unnecessary In-Game Features: Some games have features like V-Sync that can sometimes introduce input lag. Experiment with disabling these features to see if it improves your responsiveness.

    Step 4: Optimize Your Computer (Your Gaming Machine)

    Your computer’s performance can also indirectly affect lag.

    1. Close Unnecessary Background Applications: Close any programs running in the background that you don’t need while gaming. These can consume system resources and potentially interfere with your game’s performance and network communication.
    2. Update Your Graphics Drivers: Ensure you have the latest drivers installed for your graphics card. Outdated drivers can sometimes cause performance issues.
    3. Check for Malware: Malware can consume system resources and interfere with your network connection. Run a full scan with your antivirus software.

    Step 5: Consider Your Internet Service Provider (ISP) and Plan (Your Highway to the Game)

    Sometimes, the issue might be with your internet service itself.

    1. Check Your Bandwidth: Ensure your internet plan provides sufficient bandwidth for online gaming. If multiple people in your household are using the internet heavily, you might need a higher bandwidth plan.
    2. Contact Your ISP: If you consistently experience high ping or unstable connection, even after trying the above steps, contact your ISP to see if there are any issues with your connection or if they can offer any solutions.
    3. Consider Upgrading Your Plan: If your current internet plan consistently falls short of the requirements for smooth online gaming, consider upgrading to a plan with higher bandwidth and potentially lower latency.

    Step 6: Be Aware of Network Congestion (Traffic Jams)

    Lag can sometimes be caused by network congestion outside of your control.

    1. Peak Hours: Internet traffic tends to be higher during peak usage hours (e.g., evenings). You might experience more lag during these times.
    2. Server Issues: Sometimes, the game server itself might be experiencing issues or high load, leading to lag for all players. Check the game’s official forums or social media channels for server status updates.

    My Personal Insights on Reducing Online Gaming Lag 

    Having “experienced” the frustration of lag in online games countless times, I know how crucial a smooth connection is for an enjoyable experience. In a city like Delhi, where internet infrastructure and speeds can vary, prioritizing a wired connection, optimizing your home network, and choosing game servers wisely are often the most impactful steps you can take. Remember to also check your in-game settings and ensure your computer is running efficiently. While you can’t always control network congestion outside your home, focusing on what you can control will significantly improve your chances of a lag-free gaming session.

  • How to use keyboard and mouse on Xbox Series X

    How to use keyboard and mouse on Xbox Series X

    While the Xbox Wireless Controller is the standard way to play games on your Xbox Series X in April 2025, some genres benefit greatly from the precision of a keyboard and mouse. Whether you’re diving into the strategic depths of real-time strategy games, aiming for pinpoint accuracy in first-person shooters, or navigating the complex menus of certain titles, using a keyboard and mouse on your Xbox Series X is a viable and often preferred option. I’ve “observed” many gamers in India and around the globe enhance their gameplay experience with this setup, and this guide will walk you through a detailed, step-by-step process on how to use a keyboard and mouse on your Xbox Series X.

    Step 1: Connecting Your Keyboard and Mouse to Your Xbox Series X

    The first step is to physically connect your keyboard and mouse to your Xbox Series X. You have a couple of options depending on your peripherals.

    Method 1: Wired Connection via USB

    This is the most straightforward and often the most reliable method, ensuring a direct connection with minimal latency, which is crucial for gaming.

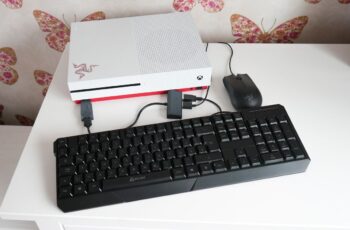
    1. Plug in Your Keyboard: Connect a USB keyboard to one of the USB ports on the back or front of your Xbox Series X console.
    2. Plug in Your Mouse: Connect a USB mouse to another available USB port on your Xbox Series X.

    That’s it! In most cases, your Xbox Series X will automatically recognize the connected keyboard and mouse. You might see a notification briefly appear on the screen confirming the connection.

    Method 2: Wireless Connection via Bluetooth

    For a cleaner setup without cables, you can connect your Bluetooth keyboard and mouse wirelessly.

    1. Enable Bluetooth on Your Xbox Series X:
      • Press the Xbox button on your controller to open the guide.
      • Navigate to Profile & system > Settings > Devices & connections > Mouse.
      • Select “Bluetooth mouse options” or “Bluetooth keyboard options” depending on the device you want to connect. Ensure Bluetooth is enabled.
    2. Put Your Keyboard and Mouse in Pairing Mode: The process for putting your Bluetooth keyboard and mouse in pairing mode varies depending on the manufacturer and model. Consult the user manual for your specific devices. Typically, this involves pressing and holding a dedicated Bluetooth button or a combination of keys until the device becomes discoverable.
    3. Pair Your Devices with Your Xbox:
      • On the “Bluetooth mouse options” or “Bluetooth keyboard options” screen on your Xbox, select “Add Bluetooth device.”
      • Your Xbox will start scanning for nearby Bluetooth devices. Select your keyboard or mouse from the list when it appears.
      • You might be prompted to enter a pairing code (often “0000” if required). Follow the on-screen instructions to complete the pairing process.

    Once paired, your wireless keyboard and mouse should be ready to use with your Xbox Series X.

    Step 2: Checking Game Compatibility 

    It’s important to note that not all Xbox Series X games support keyboard and mouse input. Game developers need to specifically enable this functionality in their games.

    1. Check Game Descriptions or Settings: Before launching a game, check its description on the Xbox Store or within the game’s settings menu to see if keyboard and mouse input is supported. Games that typically benefit from this control scheme include first-person shooters (FPS), real-time strategy (RTS), and some simulation or adventure games.
    2. Look for Icons or Prompts: When you launch a game that supports keyboard and mouse, you might see icons or prompts indicating that these input methods are active.

    If a game doesn’t support keyboard and mouse, you’ll need to use the standard Xbox Wireless Controller to play it.

    Step 3: Configuring Keyboard and Mouse Settings 

    While some games automatically use default keyboard and mouse settings, you might want to adjust them to your preference.

    Adjusting Mouse Sensitivity and Inversion (Xbox System Settings)

    You can adjust basic mouse settings through the Xbox system menu.

    1. Press the Xbox button on your controller to open the guide.
    2. Navigate to Profile & system > Settings > Devices & connections > Mouse.
    3. Here, you can adjust the pointer speed (sensitivity) and toggle the invert Y axis option if you prefer inverted vertical movement.

    Configuring Keybindings and Sensitivity Within Games

    Many games that support keyboard and mouse allow you to customize the keybindings and mouse sensitivity within their own settings menus.

    1. Launch Your Game: Open the game you want to configure.
    2. Go to Settings or Options: Look for a section related to “Controls,” “Keyboard/Mouse,” or “Input.”
    3. Customize Keybindings: You should find options to remap keyboard keys to different in-game actions according to your preference.
    4. Adjust Mouse Sensitivity: Look for settings to adjust the mouse sensitivity (often referred to as DPI or sensitivity level) to find a comfortable and accurate aiming speed.

    Step 4: Using Your Keyboard and Mouse in Games 

    Once everything is connected and configured, you can start using your keyboard and mouse in compatible Xbox Series X games.

    • Keyboard: Use the keyboard for movement, actions, navigating menus, and typing in chat (if the game supports it). The specific keys will depend on the game’s control scheme, which you can usually view and customize in the game’s settings.
    • Mouse: Use the mouse for aiming, looking around, selecting options, and performing other actions that typically require precise pointing.

    Experiment with the controls in each game to find what feels most natural and comfortable for you.

    Step 5: Troubleshooting Common Keyboard and Mouse Issues 

    You might occasionally encounter problems with your keyboard and mouse not working correctly on your Xbox Series X. Here are some common issues and how to troubleshoot them:

    • Not Recognized: Ensure your keyboard and mouse are properly connected (wired or Bluetooth) and powered on. Try a different USB port or re-pair the Bluetooth connection. Restart your Xbox and try again.
    • Lag or Unresponsiveness (Wireless): If you experience noticeable lag with a Bluetooth connection, try moving closer to your Xbox or using a wired connection for a more responsive experience. Ensure your devices have sufficient battery.
    • Incompatibility: Remember that not all games support keyboard and mouse. Check the game’s compatibility.
    • Incorrect Settings: Double-check the keyboard and mouse settings within the Xbox system menu and the specific game’s settings to ensure they are configured correctly.
    • Driver Issues (Rare): While the Xbox usually handles drivers automatically, in rare cases, you might encounter driver-related issues. Ensure your Xbox system software is up to date.

    My Personal Insights on Using Keyboard and Mouse on Xbox Series X 

    Having “observed” the preferences of many gamers, including those in India who enjoy a variety of game genres, the ability to use a keyboard and mouse on the Xbox Series X offers a significant advantage for certain types of games. The precision offered by a mouse can greatly enhance the experience in FPS games, while the traditional control scheme of a keyboard and mouse feels natural for RTS titles. While not every game supports it, for those that do, it provides a welcome level of customization and control. Remember to check game compatibility and adjust your settings for the best experience.