Your Samsung Galaxy phone, like all Android devices, uses various forms of cache to speed up its operations. The cache partition is a dedicated area on your device’s storage that stores temporary system data, log files, and frequently accessed app components. This data helps your phone quickly retrieve information, making apps launch faster and the overall user experience smoother.
However, over time, this cached data can become corrupted, outdated, or simply too large. This accumulation can lead to various performance issues such as:
- Slowdowns and lag: Your phone might feel sluggish.
- App crashes: Applications might close unexpectedly.
- Battery drain: Inconsistent cached data can sometimes contribute to increased power consumption.
- Random reboots: System instability can lead to unexpected restarts.
- Glitches after software updates: New software might conflict with old cached data.
Wiping the cache partition is a common troubleshooting step recommended by Samsung and Android experts. It’s a safe procedure that cleans out this temporary system data without affecting your personal files, photos, videos, or installed applications. Think of it as giving your phone a deep clean without having to reorganize your entire house.
The Evolution of Android Recovery: The Android Recovery Mode, where you perform a cache wipe, has been a fundamental part of the Android operating system since its early days. This special boot mode allows users to perform system-level tasks like factory resets, applying updates, and clearing the cache partition, acting as a vital diagnostic and maintenance tool for device management.
How to Wipe Cache Partition on Your Samsung Galaxy
The process to wipe the cache partition on a Samsung Galaxy phone involves booting into Recovery Mode. The exact button combination can vary slightly depending on your specific Galaxy model, especially with the introduction of USB-C and the removal of the dedicated Bixby button on some newer devices. We’ll cover the most common methods.
Step 1: Power Off Your Samsung Galaxy Phone
Before you can access Recovery Mode, your device needs to be completely powered down.
- Action: Press and hold the Power button (or the Power and Volume Down buttons simultaneously on newer models) until the power options appear on the screen. Select “Power off.” Wait a few moments to ensure the phone is completely shut down.
Step 2: Connect Your Phone to a Computer or Headphones (Important for Newer Models)
This is a crucial step that often trips up users, especially with newer Samsung Galaxy models. Many recent Samsung phones (roughly those running Android 11 or later, or those released from 2020 onwards) require a physical connection to a computer (or sometimes even wired headphones) to enter Recovery Mode.
- Option A: Connect to a Computer (Most Common for Newer Models):
- Action: Using a USB-C cable, connect your powered-off Samsung Galaxy phone to a computer (PC or Mac). It doesn’t matter if the computer is turned on or off. The connection simply needs to be established.
- Option B: Connect Wired Headphones (Some Specific Models):
- Action: For some specific Samsung models that have a 3.5mm headphone jack (or for older models that don’t require a PC connection), plugging in wired headphones might suffice to enable Recovery Mode entry without a computer. However, the PC connection method is more universally reliable for recent devices.
- Option C: No Connection Needed (Older Models with Home or Bixby Button):
- Action: If you have an older Samsung Galaxy model with a physical Home button or a dedicated Bixby button, you might not need to connect to anything. Proceed directly to Step 3.
Step 3: Boot into Recovery Mode using Button Combinations
Now, with your phone off and connected (if necessary), you’ll use a specific button combination to enter Recovery Mode.
- For Samsung Galaxy models WITHOUT a Bixby button (most common for recent devices, e.g., S21, S22, S23, A-series):
- Action: Press and hold the Volume Up button and the Power button simultaneously. Keep holding them down.
- For Samsung Galaxy models WITH a Bixby button (e.g., S8, S9, S10, Note 8, Note 9, Note 10):
- Action: Press and hold the Volume Up button, the Bixby button, and the Power button simultaneously. Keep holding them down.
- For Older Samsung Galaxy models WITH a Home button (e.g., S6, S7, Note 5):
- Action: Press and hold the Volume Up button, the Home button, and the Power button simultaneously. Keep holding them down.
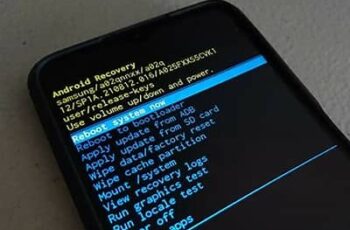
Step 4: Navigate to “Wipe Cache Partition”
Once you’ve held the buttons long enough, the screen will eventually show the Android Recovery menu. It will look like a basic text-based menu with various options.
- Navigation: The touchscreen will not work in Recovery Mode. You need to use the Volume Down button to scroll through the options.
- Selection: Use the Power button to select an option.
- Action:
- Use the Volume Down button to scroll down and highlight “Wipe cache partition.”
- Press the Power button to select it.
Step 5: Confirm the Wipe
You will be asked to confirm your choice, as this action cannot be undone.
- Action:
- Use the Volume Down button to highlight “Yes.”
- Press the Power button to confirm.
Note: The process is usually very quick, often just a few seconds. You’ll see a small message at the bottom of the screen indicating “Cache wipe complete.”
Step 6: Reboot Your System
After the cache partition has been wiped, you will be returned to the main Android Recovery menu.
- Action:
- The first option, “Reboot system now,” will usually be highlighted by default.
- Press the Power button to select it.
Your Samsung Galaxy phone will now restart normally. It might take a little longer than usual for the first boot after wiping the cache partition, as the system recreates necessary temporary files.
What to Expect After Wiping Cache Partition
- Improved Performance: You might notice a snappier, more responsive phone.
- Resolved Glitches: Issues like app crashes or random freezes might be gone.
- No Data Loss: Reassuringly, all your apps, photos, contacts, and personal settings will remain intact.
- Apps May Be Slower Initially: Some apps might load slightly slower the first time you open them after the wipe, as they rebuild their individual caches. This is normal and temporary.
When to Wipe Cache Partition
Consider wiping your cache partition if you experience:
- General phone slowdowns or lag.
- Frequent app crashes or freezing.
- Excessive battery drain without clear cause.
- Unexplained glitches after a software update.
- Before and after a major Android version update (though not strictly necessary, it can prevent potential conflicts).
Frequently Asked Questions (FAQ)
Q1: What is the difference between wiping cache partition and factory reset?
Wiping the cache partition only deletes temporary system files and does not affect your personal data, apps, or settings. A factory reset, on the other hand, erases everything on your phone, restoring it to its original state as if it just came out of the box. It’s a much more drastic measure used as a last resort.
Q2: Will wiping the cache partition delete my photos, apps, or contacts?
No, absolutely not. Wiping the cache partition is a safe procedure that only removes temporary system files. Your photos, videos, contacts, messages, downloaded apps, and personal settings will remain untouched.
Q3: How often should I wipe the cache partition on my Samsung Galaxy?
There’s no fixed schedule. You should wipe the cache partition only when you experience performance issues, such as lag, app crashes, or unexplained glitches. Doing it regularly without issues isn’t necessary. It’s often recommended after major Android version updates.
Q4: My Samsung phone is stuck on the Samsung logo after wiping the cache. What do I do?
If your phone gets stuck on the Samsung logo (a “boot loop”) after wiping the cache, it’s a rare but serious issue. First, try forcing a restart (hold Power and Volume Down for about 10-15 seconds). If that doesn’t work, you might have to consider a factory reset from Recovery Mode as a last resort, as this usually indicates deeper software corruption. If the issue persists, professional repair might be needed.
Q5: Why do I need to connect my Samsung phone to a computer to wipe the cache partition?
For many newer Samsung Galaxy models, Samsung implemented a security measure that requires a physical connection (usually via USB-C to a computer, or sometimes wired headphones) to allow access to the Recovery Mode. This prevents accidental entry or unauthorized access to system-level functions.
Q6: Can wiping the cache partition improve battery life?
Potentially, yes. Corrupted or bloated cached data can sometimes lead to the system working harder than necessary, which can contribute to increased battery drain. By clearing this cache, you can eliminate such inefficiencies and potentially see a minor improvement in battery performance. However, it’s usually not a primary fix for significant battery degradation.